Flat the Mountain Upgrade Spend Tier List
Where every early dollar should go before you obsess over vanity skills.
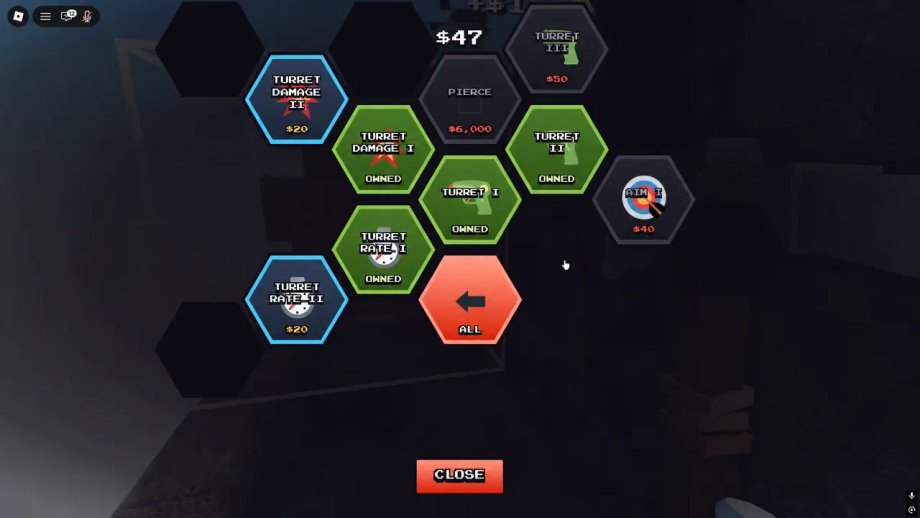
Cash decisions decide whether Flatten The Mountain feels like a crisp incremental or a coal-stained slog. This Upgrade Spend Priority list ranks DomBlox Games’ cash sinks for Roblox miners who need drones, turrets, and Auto Mine online before deep layers. Pair it with the Pickaxe Tier List — gems and cash are different wallets.
Ranking lens
We score upgrades by minutes saved per dollar on the road to flattening ~89 layers, synergy with ore payouts (Diamond +$320 down to Coal filler), and how well they free you to dig chests or dodge the eagle. Prices referenced: Damage I $1, Drone I $5, Turret I ~$23, Auto Mine ~$200. Power-ups 2X Money and Mining Speed x1.5 are map pickups, not shop rows, but they change spend timing.
S tier spends
Drone I and early drone levels — Five dollars starts a second miner that never complains. Drones keep layers dying while you reposition for ores or chests. Additional drone levels stay high priority until returns flatten.
Turret I (~$23) and early turret levels — Turrets cover angles drones miss and stabilize AFK-leaning play. Skipping turrets to hoard for cosmetics is a common first-hour mistake.
Auto Mine (~$200) — The quality-of-life spike. Once purchased, your attention shifts to routing, eagle callouts, and gem targets instead of click stamina. Save deliberately; do not impulse every skill node beforehand.
A tier spends
Damage I ($1) and early damage nodes — Cheap teaching tools that make Stone/Golden swings less pathetic. Continue damage after drones/turrets exist, but do not empty the wallet before automation.
Core player skill-tree nodes that raise mining yield or move speed — Anything that shortens travel between diamond pockets and chest digs. Exact names vary by UI; prioritize throughput over prestige labels.
Reinvesting into drones/turrets after Auto Mine — Second wave automation often beats speculative late skills while you still hold Amethyst or Miner’s Dream.
B tier spends
Mid skill-tree convenience nodes — Nice when surplus cash appears during 2X Money windows.
Situational defensive or QoL skills — Helpful if they reduce time lost to misclicks, not if they only look flashy in the menu.
Over-leveling a single turret past soft diminishing returns — Better to balance drone and turret counts (see Drones and Turrets).
C tier spends
Vanity or meme skills before Auto Mine — Feels fun, tanks clear time.
Hoarding six figures of cash “for later” — Idle cash earns nothing; the mountain does not wait.
Buying duplicate dead-end nodes because a random tip said so — Trust ore math and automation first.
First-hour purchase order
- Damage I ($1) — prove the shop loop.
- Drone I ($5) — start parallel damage.
- Turret I (~$23) — cover more blocks.
- Sprinkle damage / drone / turret levels with ore income.
- Bank toward Auto Mine (~$200).
- Resume balanced automation + productive skills.
- Convert gems separately up the pickaxe ladder.
This order slots cleanly into Getting Started and the Mining Loop guide. First clears near ~51 minutes with ~400 gems become realistic once Auto Mine and chest discipline exist; Storm Hammer runs near ~33 minutes still need the legendary axe plus this cash backbone.
Power-up timing
When 2X Money spawns, stop traveling to mediocre veins — hit Diamond/Ruby while the buff lives, then dump the burst into the next S-tier missing piece. Mining Speed x1.5 is the moment to stand on dense stone bands or finish a chest dig. Do not AFK in the shop UI during either buff.
Mode-specific notes
Solo — Follow S-tier strictly; you are the only cash earner.
Duo / Trio / Squad (1–4) — Agree who buys shared-impact automation if progress is party-visible; avoid three people racing vanity skills. Public servers (up to 20) may not share economy — assume personal wallets.
Script users — SoftKillz/ALTER Auto Upgrade must be whitelisted to these priorities or it will ruin your curve (Scripts Hub).
Related hubs
Parent: Tier List Hub. Strategy: Clear All Layers, Eagle Survival, Tools Hub. Economy patches: Updates Hub.
Spend like a speedrunner even if you play casually. Drones, turrets, and Auto Mine print time; everything else is negotiable until the peak is flat.
Frequently Asked Questions
Quick answers for Flat the Mountain players.
What is the first upgrade I should buy?
Damage I for $1, then Drone I for $5, then Turret I near $23 before saving for Auto Mine around $200.
Is Auto Mine worth 200 dollars?
Yes for most players. It frees attention for chests, ores, and eagle dodges across long layer climbs.
Should I max turrets or drones first?
Balance them. Early levels in both beat maxing one while the other sits at zero.
Do power-ups change the tier list?
They change timing. During 2X Money, focus high-value ores then immediately spend the burst on the next S-tier gap.
Are pickaxes on this list?
No. Pickaxes use gems. See the Pickaxe Tier List for axe rankings.